Recently the team behind Slock.it announced the first version of their generic DAO framework for use with Ethereum. In addition to going through a professional security audit; Griff Green, Community Organizer for Slock.it announced The Art of The DAO Challenge on their blog and Slack Channel to encourage community testing and knowledge of the contract where participants could share in a 20 ether (ETH) bounty.
I came in to the challenge with limited practical experience in Ethereum, essentially sending and receiving (the Go client for Ethereum) and managed to complete the challenge several days later after much experimenting. Here is my rundown of the the various tasks and how things went and what I learned along the way…
“The Practice Rounds”
aka Getting Started with Ethereum Wallet
Before even starting the challenge there were several steps to prepare including installing the latest version of Ethereum Wallet. I picked this up from the official Mist Github repository and of course making sure to check the checksums via Terminal in OS X to ensure I was getting the official package as the code isn’t currently signed.
The next steps required sending test Ether (or tETH for shorthand) to a test DAO token sale based on the official DAO contract with an extended timeline of 6 months to allow for practicing beyond the challenge. Unfortunately this requires actually having tETH to play with so the first step was to switch the wallet to the test network and pick some up.

There are two main methods for acquiring tETH on the test network and I used both;
- I mined some tETH very easily using my laptop as the Testnet is a lot less competitive than the main network.
- I used a few faucets such as the one at ZeroGox to get some further free tETH.
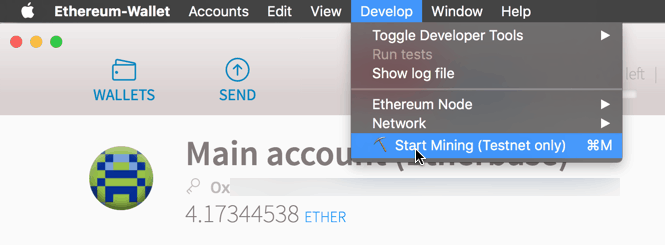
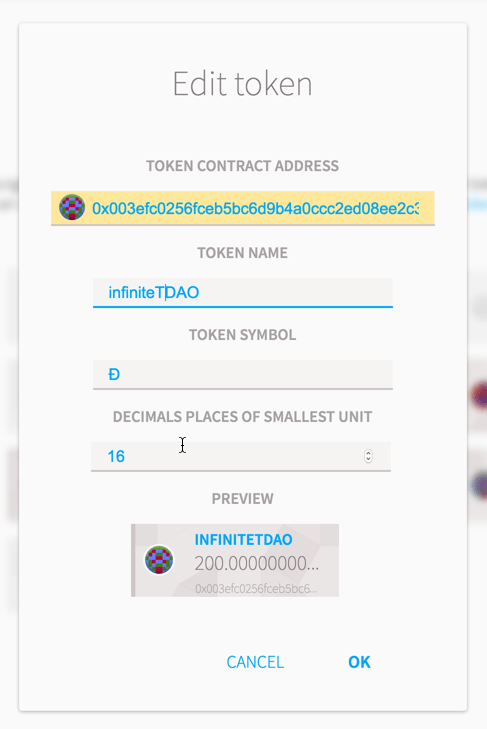
Once I had my first block (I mined 5 tETH within about 10 minutes), I proceeded to use the standard wallet functionality to send 1 tETH to the practice DAO token sale, nicknamed infiniteDAO, at the contract address 0x003efc0256fceb5bc6d9b4a0ccc2ed08ee2c31f8. This transaction actually resulted in me acquiring 100 tokens from the infiniteDAO contract, however to actually see them in my Wallet, I had to manually add a watcher. You can easily watch any token (even if you don’t own any by heading to the Contracts tab page, clicking the Watch Token option and entering the relevant details.
And to the next question; What are the relevant details? Well the first step is simply the contract address that you sent your tETH to (or real ETH on the main network). The next three details are usually set by the token creator, so you will need to get the details from them, in this case Griff from the Slock.it team. It is important you get these details right as you could quickly confuse the matter by attaching the wrong token name to a contract, or think you have more tokens than you actually do by setting the wrong decimal value. As a general guide the DAO framework referenced here should be 16 decimal places by unless specified otherwise.
The Art of The DAO Challenge
With my initial tests completed and tokens purchased it was time to move on the official #art_of_the_dao challenge! As we had already practiced purchasing tokens and adding token watchers in the warm up, the main challenge began with all participants being given some tETH and tokens in the new contract nicknamed ptDAO at the contract address 0xad23d7c443382333543dd13c3b77b99b2a7e2c6d.
We were also instructed to set up three accounts on the test network (in reality I actually set up many more whilst going through multiple experiments, and failed attempts) and read through the official white paper released by Slock.it and the DAO framework on GitHub. I had originally read the former and glanced at the latter but didn’t fully grasp either until going through this challenge.

Setting up the Token Interface
The DAO Ninja training finally hit its first manual interactions with the contract (beyond purchasing tokens) here. Technically we needed to work out how the Approve function worked but before doing that, it required that we first set up the Ethereum Wallet to interact with the full range of functions from the contract on the Blockchain.
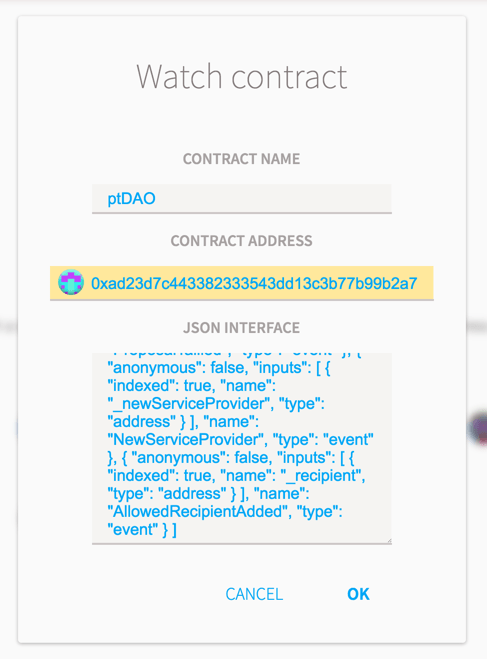
The initial setup takes place on the Contracts tab by hitting the Watch New Contract option and entering several key details provided by the token issuer. Again you must manually enter the name for the contract and the address, but also this time some JSON code which is used to generate the interface for the contract inside your Ethereum wallet. Luckily you don’t need to understand this code but you do need to trust the source of it, so it is something the token creator will likely open source and host on GitHub or their official website for you to use.
Working with the “Approve” Function
Once the token interface is set up you can start interacting with it by clicking on it’s name in the Custom Contracts section of the Contracts tab where you will see an option to Show Contract Info. It is here you expose the various elements of the DAO contract that you can interact with.
The art of the DAO challenge required that we use the approve function on two separate addresses, one of the service provider, now called a curator, and another to one of our own accounts. The Service Provider address, or Curator address as it is now known, could be found in the Read From Contract section, and is a key role in the DAO as they are able to manage the addition and removal of Contractor addresses, essentially who the DAO funds and works with.
The Approve function is part of EIP 20, the Ethereum Token Standard, so this is a function that will be available in any token built on the Ethereum network. By experimenting with the Approve function, and re-reading the white paper, it became clear that it pre-approves the transaction availability of DAO tokens equaling the number entered into the _amount field from the executing account by another third party specified in the _spender field.
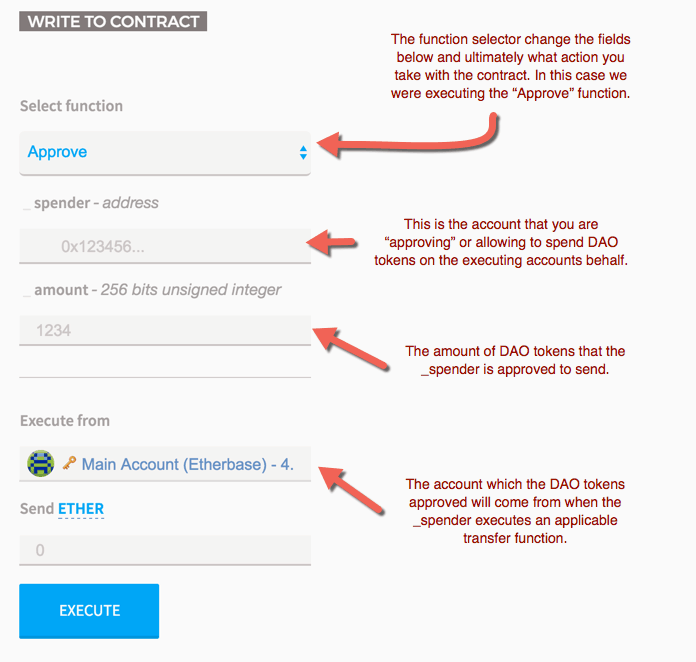
Once the Approve function has been executed successfully it enables two new functions, Transfer From and Transfer From Without Reward, for the owner of the address used in the _spender field as shown above. The main difference being that the Transfer From Without Reward function first executes an internal function of the contract that collects any rewards applicable to the account owner before sending the tokens. If simply using the Transfer From function you may inadvertently send more DAO token value than expected by also transferring unrealised Reward amounts.
Another question that occurred to me throughout all of this was why you would even want to approve another account to transfer your tokens, and it was described by several members of the #art_of_the_dao channel as a kind of cheque. You pre-approve funds (or DAO tokens in this case) to another account, whether in your control or not, to be collected at a later date, but whilst the DAO tokens are still in your account you can use them as your own by participating in votes etc.
It is also possible to send DAO tokens directly to anyone without going through any pre-approval or extra steps by simply selecting the “Transfer” function found within the same Write to Contract section used above, or by clicking into the wallet account that owns the tokens and using the built in Send functionality shown below.
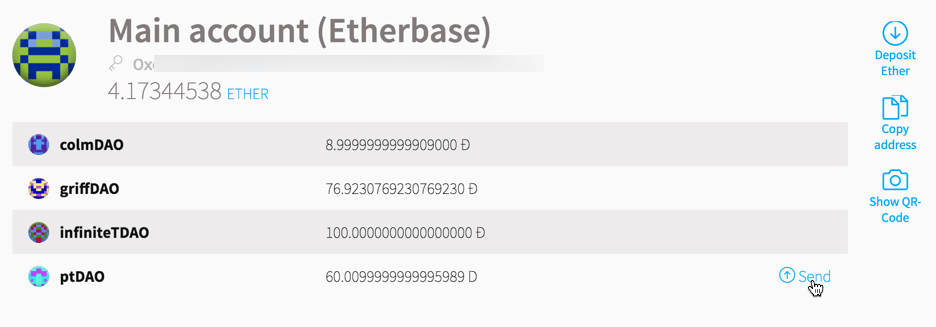
Getting Started With Proposals
Once an understanding of the basic DAO token was achieved, it was time to move on to proposals which are a core function of the DAO and ultimately how projects such as the Ethereum Computer will be both proposed to a DAO contract and either accepted or declined by it’s owners (DAO token holders).
The first step was submitting a proposal to understand how one might submit a project for review by the DAO. This is done via the New Proposal function in the Write To Contract section of the DAO interface. There is only a limited space for information within the proposal code itself so when a proposal is created the description and ID will likely be linked to a specific place on the web such as theDAOHub.org forum where people can get into the reality of what the proposal entails and how it will benefit the DAO. The actual recipient address must already be approved by the DAO Curator unless the proposal itself is to add a new Curator to the DAO.
The screenshot below shows the New Proposal form on the right and one of my already submitted proposals on the left which was accessed by entering the proposal ID into the darker grey box near the top. Whilst submitting this proposal for the challenge I encountered several issues, the main one being not entering a value into the Send ETHER section as a 20 ether deposit is currently required for proposals (this amount may vary depending on the specific DAO contract you are interacting with). Another concern was what unit the debating period was, this turned out to be measured in seconds, and is important as proposals typically require a minimum two week period (1209600 seconds) of voting unless a new service provider or curator is being suggested and then a minimum 10 day (864000 seconds) debating period is required.
Note: For the purposes of this challenge both of the minimum debating periods were actually disabled by Griff to enable faster testing. Something I discovered after submitting this proposal which is still ongoing at the time of writing!
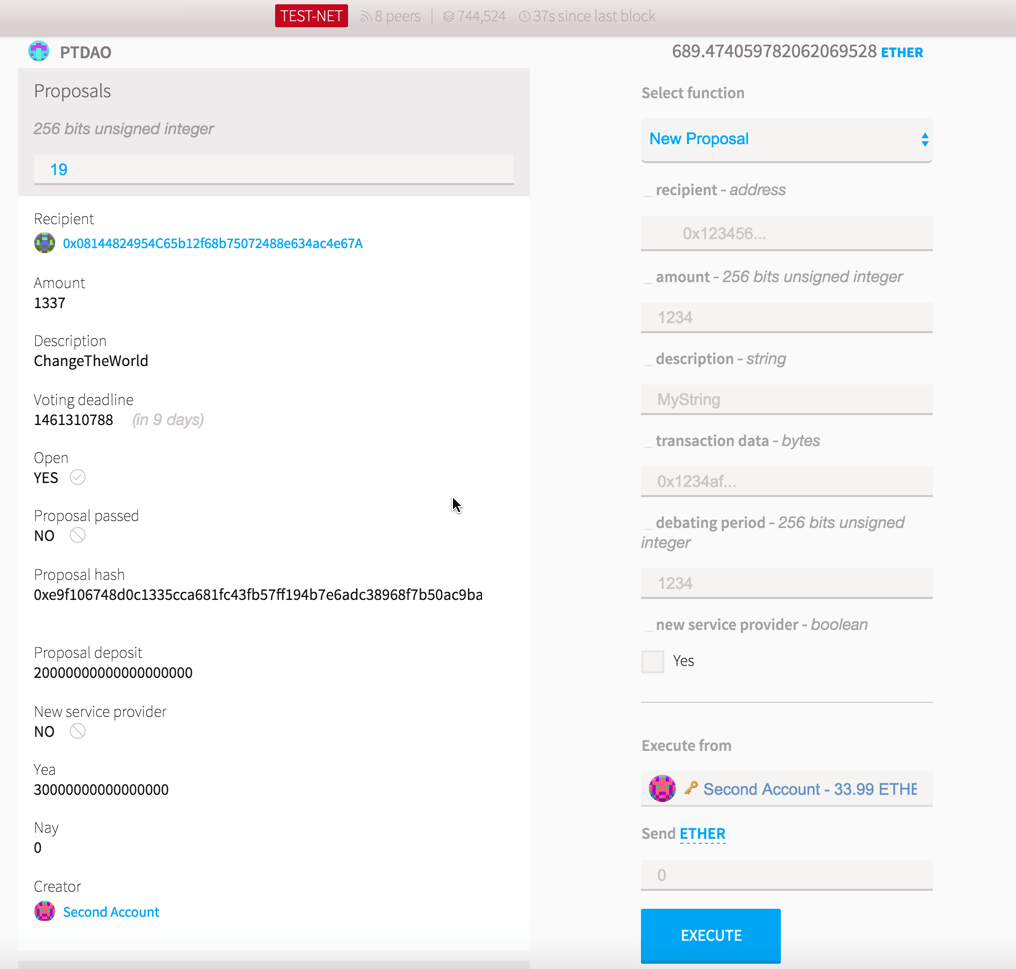
Once a proposal such as the one shown above is live the debating period begins and any holder of ptDAO tokens becomes eligible to vote on the proposal by selecting and executing the Vote function in the Write To Contract section of the contract interface. As part of the challenge I voted on my own proposal and the number you see in the “Yea” votes is the same as the amount of tokens owned by token holders who voted For the proposal. Eventually after the vote has passed, any token holder can run the Execute function along with the Proposal ID to action the the details in the proposal such as a transfer of value and initiate any other actions linked to the success or failure of the proposal.
Splitting The DAO
There are also occasions where one might want to suggest a new Curator (Service Provider) and in these instances the exact same New Proposal function is used with a few key differences in what is entered. In this case the recipient can be an address that is not already on the Allowed Recipients list, such as a suggested new Curator, and for this challenge we had to check the _new service provider box although I believe this will change to refer to Curator in the future. No deposit is required for this kind of proposal so no tETH or ETH needs to be sent and and once submitted you can Vote for your proposal.
After the debating period has passed you are able to use the SplitDAO function on the Proposal ID and the DAO tokens used to vote for the new Service Provider Curator are sent to a burner address which lowers the total supply of DAO tokens and transfers the value in tETH or ETH to a newly generated contract that we can nickname splitDAO. When actioning this as part of the challenge the burning of tokens could be witnessed by the fall in the Total Supply: before SplitDAO was executed 58970000000000000000 jentzsch to the lower amount after execution 58969900000000000000 jentzsch, where jentzsch is the DAO equivalent of wei (1 ETH = 10^18 wei, 1 DAO token = 10^16 jentzsch). The total supply of DAO tokens, amongst many other things, can be viewed in the Read From Contract section.

The art of the DAO challenge also suggested that some important information was missing when executing SplitDAO in the Ethereum Wallet interface. When they said it was important they meant it; the information was the contract address of the newly formed splitDAO, and most importantly where all that value taken from the original DAO was transferred to. Luckily as everything takes place on the blockchain I was able to identify this by viewing the transaction details via the hash on Etherscan.

In the image above you can see several Contracts being created and value being transferred to one address which I guessed to be the new DAO. By taking the contract address that was being sent tETH and adding it to my watched tokens I was then able to verify that I had in fact received splitDAO tokens to my address that had voted for the new Curator (service provider) proposal. I have also heard there is a solution for discovering this directly in Ethereum Wallet in the works.
In Conclusion…
Whilst the above doesn’t spell out the exact answers to each step of the challenge (those were sent privately to Griff as requested), it does cover most of the learning process and steps I went through as part of the Art of The DAO challenge. It was definitely an educational, and occasionally frustrating, experience but I can say without a doubt that it was a great way to dive into the DAO setup and I’m thankful for Griff having encouraged us to get involved through the challenge.
Over time I would expect many of the actions to become easier as the function calls are abstracted behind a simplified DAPP interface. However if you want to get involved as a token holder in any DAO based on the generic DAO framework, the steps above are something I would highly recommend experimenting with on the test network or at least getting involved with the #art_of_the_dao channel and #dao_framework channel on the Slock.it Slack. It also seems likely there will be a growing community of people working through DAO related issues on the recently launched DAOHub.org.
Best of luck!

Great Post! Thank you Daniel for taking this challange head on… Clearly you are on your way to mastering the Art of The DAO . Can’t wait to see what your Future DAOs accomplish!